本例中将使用前面介绍的函数,将它们组合在一起实现一个具有机器翻译功能的例。该例中共涉及4个代码文件,各文件说明如下。
- 文件“9-33 datautil.py”:样本预处理文件。
- 文件“9-34 seq2seq_model.py”:模型文件,该文件是在GitHub上TensorFlow的例子基础上修改而来。
- 文件“9-35 train.py”:模型的训练文件。
- 文件“9-36 test.py”:模型的测试使用文件。
本例同样也是先从样本入手,然后搭建模型、训练、测试,具体步骤如下。
实例描述
准备一部分中英对照的翻译语料,使用Seq2Seq模式对其进行学习,拟合特征,从而实现机器翻译。
1.样本准备
对于样本的准备,本书配套资源中提供了一个“中英文平行语料库.rar”文件,如果读者需要更多、更全的样本,需要自己准备。解压后有两个文件,一个是英文文件,一个是对应的中文文件。
如果想与本书同步路径,可以将英文文件放到代码同级文件夹fanyichina\yuliao\from下;
中文文件放在代码同级文件夹fanyichina\yuliao\to下。
2.生成中、英文字典
编写代码,分别载入两个文件,并生成正反向字典。
注意: 样本的编码是UTF-8,如果读者使用自己定义的样本,不是UTF-8编码,则在读取文件时会报错,需要改成正确的编码。如果是
Windows编辑的样本,编码为GB2312。
代码9-33 datautil
01 data_dir = "fanyichina/"
02 raw_data_dir = "fanyichina/yuliao/from"
03 raw_data_dir_to = "fanyichina/yuliao/to"
04 vocabulary_fileen ="dicten.txt"
05 vocabulary_filech = "dictch.txt"
06
07 plot_histograms = plot_scatter =True
08 vocab_size =40000
09
10 max_num_lines =1
11 max_target_size = 200
12 max_source_size = 200
13
14 def main():
15 vocabulary_filenameen = os.path.join(data_dir, vocabulary_fileen)
16 vocabulary_filenamech = os.path.join(data_dir, vocabulary_filech)
17 ##############################
18 # 创建英文字典
19 training_dataen, counten, dictionaryen, reverse_dictionaryen,
textsszen =create_vocabulary(vocabulary_filenameen
20 ,raw_data_dir,vocab_
size,Isch=False,normalize_digits = True)
21 print("training_data",len(training_dataen))
22 print("dictionary",len(dictionaryen))
23 #########################
24 #创建中文字典
25 training_datach, countch, dictionarych, reverse_dictionarych,
textsszch =create_vocabulary(vocabulary_filenamech
26 ,raw_data_dir_to,vocab_
size,Isch=True,normalize_digits = True)
27 print("training_datach",len(training_datach))
28 print("dictionarych",len(dictionarych))
执行完上面的代码后,会在当前目录下的fanyichina文件夹里找到dicten.txt与dictch.txt两个字典文件。
其中所调用的部分代码定义如下,严格来讲本例中生成的应该是词点,因为在中文处理中用了jieba分词库将文字分开了,是以词为单位存储对应索引的。
代码9-33 datautil(续)
29 import jieba
30 jieba.load_userdict("myjiebadict.txt")
31
32 def fenci(training_data):
33 seg_list = jieba.cut(training_data) # 默认是精确模式
34 training_ci = " ".join(seg_list)
35 training_ci = training_ci.split()
36 return training_ci
37
38 import collections
39 #系统字符,创建字典时需要加入
40 _PAD = "_PAD"
41 _GO = "_GO"
42 _EOS = "_EOS"
43 _UNK = "_UNK"
44
45 PAD_ID = 0
46 GO_ID = 1
47 EOS_ID = 2
48 UNK_ID = 3
49
50 #文字字符替换,不属于系统字符
51 _NUM = "_NUM"
52 #Isch=true 中文,
false 英文
53 #创建词典,max_vocabulary_size=500代表字典中有500个词
54 def create_vocabulary(vocabulary_file, raw_data_dir, max_vocabulary_
size,Isch=True, normalize_digits=True):
55 texts,textssz = get_ch_path_text(raw_data_dir,Isch,normalize_digits)
56 print( texts[0],len(texts))
57 print("行数",len(textssz),textssz)
58 # 处理多行文本texts
59 all_words = []
60 for label in texts:
61 print("词数",len(label))
62 all_words += [word for word in label]
63 print("词数",len(all_words))
64
65 training_label, count, dictionary, reverse_dictionary = build_
dataset(all_words,max_vocabulary_size)
66 print("reverse_dictionary",reverse_dictionary,len(reverse_
dictionary))
67 if not gfile.Exists(vocabulary_file):
68 print("Creating vocabulary %s from data %s" % (vocabulary_file,
data_dir))
69 if len(reverse_dictionary) > max_vocabulary_size:
70 reverse_dictionary = reverse_dictionary[:max_vocabulary_
size]
71 with gfile.GFile(vocabulary_file, mode="w") as vocab_file:
72 for w in reverse_dictionary:
73 print(reverse_dictionary[w])
74 vocab_file.write(reverse_dictionary[w] + "\n")
75 else:
76 print("already have vocabulary! do nothing !!!!!!!!!!!!!!!!!
!!!!!!!!!!!!")
77 return training_label, count, dictionary, reverse_dictionary,
textssz
78
79 def build_dataset(words, n_words):
80 """Process raw inputs into a dataset."""
81 count = [[_PAD, -1],[_GO, -1],[_EOS, -1],[_UNK, -1]]
82 count.extend(collections.Counter(words).most_common(n_words - 1))
83 dictionary = dict()
84 for word, _ in count:
85 dictionary[word] = len(dictionary)
86 data = list()
87 unk_count = 0
88 for word in words:
89 if word in dictionary:
90 index = dictionary[word]
91 else:
92 index = 0 # dictionary['UNK']
93 unk_count += 1
94 data.append(index)
95 count[0][1] = unk_count
96 reversed_dictionary = dict(zip(dictionary.values(), dictionary.
keys()))
97 return data, count, dictionary, reversed_dictionary
在字典中添加额外的字符标记PAD、_GO、_EOS、_UNK是为了在训练模型时起到辅助标记的作用。
- PAD用于在桶机制中为了对齐填充占位。
- _GO是解码输入时的开头标志位。
- _EOS是用来标记输出结果的结尾。
- _UNK用来代替处理样本时出现字典中没有的字符。另外还有_NUM,用来代替文件中的数字(_NUM是根据处理的内容可选项,如果内容与数字高度相关,就不能用NUM来代替)。
在jieba的分词库中,附加一个字典文件myjiebadict.txt,以免自定义的字符标记被分开。myjiebadict.txt里的内容如下:
_NUM nz
_PAD nz
_GO nz
_EOS nz
_UNK nz
每一行有两项,用空格分开,第一项为指定的字符,第二项nz代表不能被分开的意思。
3.将数据转成索引格式
原始的中英文是无法让机器认知的,所以要根据字典中对应词的索引对原始文件进行相应的
转化,方便读取。在本地建立两个文件夹
fanyichina\fromids和fanyichina\toids,用于存放生
成的ids文件。在main函数中编写以下代码,先通
过initialize_vocabulary将前面生成的字典读入内存
中,然后使用textdir_to_idsdir函数将文本转成ids
文件。
textdir_to_idsdir函数中最后的两个参数说明如下。
- normalize_digits:代表是否将数字替换掉。
- Isch:表示是否是按中文方式处理。
中文方式会在处理过程中对读入的文本进行一次jieba分词。
代码9-33 datautil(续)
98 def main():
99 ……
100 vocaben, rev_vocaben =initialize_vocabulary(vocabulary_
filenameen)
101 vocabch, rev_vocabch =initialize_vocabulary(vocabulary_
filenamech)
102
103 print(len(rev_vocaben))
104 textdir_to_idsdir(raw_data_dir,data_dir+"fromids/",vocaben,normalize_digits=True,Isch=False)
105 textdir_to_idsdir(raw_data_dir_to,data_dir+"toids/",vocabch,normalize_digits=True,Isch=True)
所使用的函数定义如下:
代码9-33 datautil(续)
106 def initialize_vocabulary(vocabulary_path):
107 if gfile.Exists(vocabulary_path):
108 rev_vocab = []
109 with gfile.GFile(vocabulary_path, mode="r") as f:
110 rev_vocab.extend(f.readlines())
111 rev_vocab = [line.strip() for line in rev_vocab]
112 vocab = dict([(x, y) for (y, x) in enumerate(rev_vocab)])
113 return vocab, rev_vocab
114 else:
115 raise ValueError("Vocabulary file %s not found.", vocabulary_path)
116 #将文件批量转成ids文件
117 def textdir_to_idsdir(textdir,idsdir,vocab, normalize_digits=True,Isch=True):
118 text_files,filenames = getRawFileList(textdir)
119
120 if len(text_files)== 0:
121 raise ValueError("err:no files in ",raw_data_dir)
122
123 print(len(text_files),"files,one is",text_files[0])
124
125 for text_file,name in zip(text_files,filenames):
126 print(text_file,idsdir+name)
127 textfile_to_idsfile(text_file,idsdir+name,vocab, normalize_digits,Isch)
其他用到的底层函数代码如下:
代码9-33 datautil(续)
128 #获取文件列表
129 def getRawFileList( path):
130 files = []
131 names = []
132 for f in os.listdir(path):
133 if not f.endswith("~") or not f == "":
134 files.append(os.path.join(path, f))
135 names.append(f)
136 return files,names
137 #读取分词后的中文词
138 def get_ch_lable(txt_file,Isch=True,normalize_digits=False):
139 labels= list()#""
140 labelssz = []
141 with open(txt_file, 'rb') as f:
142 for label in f:
143 linstr1 =label.decode('utf-8')
144 if normalize_digits :
145 linstr1=re.sub('\d+',_NUM,linstr1)
146 notoken = basic_tokenizer(linstr1 )
147 if Isch:
148 notoken = fenci(notoken)
149 else:
150 notoken = notoken.split()
151
152 labels.extend(notoken)
153 labelssz.append(len(labels))
154 return labels,labelssz
155
156 #获取文件中的文本
157 def get_ch_path_text(raw_data_dir,Isch=True,normalize_digits=False):
158 text_files,_ = getRawFileList(raw_data_dir)
159 labels = []
160
161 training_dataszs = list([0])
162
163 if len(text_files)== 0:
164 print("err:no files in ",raw_data_dir)
165 return labels
166 print(len(text_files),"files,one is",text_files[0])
167 shuffle(text_files)
168
169 for text_file in text_files:
170 training_data,training_datasz =get_ch_lable(text_file,Isch,normalize_digits)
171
172 training_ci = np.array(training_data)
173 training_ci = np.reshape(training_ci, [-1, ])
174 labels.append(training_ci)
175
176 training_datasz =np.array( training_datasz)+training_dataszs[-1]
177 training_dataszs.extend(list(training_datasz))
178 print("here",training_dataszs)
179 return labels,training_dataszs
180
181 def basic_tokenizer(sentence):
182 _WORD_SPLIT = "([.,!?\"':;)(])"
183 _CHWORD_SPLIT = '、|。|,|‘|’'
184 str1 = ""
185 for i in re.split(_CHWORD_SPLIT, sentence):
186 str1 = str1 +i
187 str2 = ""
188 for i in re.split(_WORD_SPLIT , str1):
189 str2 = str2 +i
190 return str2
191 #将句子转成索引ids
192 def sentence_to_ids(sentence, vocabulary,
193 normalize_digits=True,Isch=True):
194
195 if normalize_digits :
196 sentence=re.sub('\d+',_NUM,sentence)
197 notoken = basic_tokenizer(sentence )
198 if Isch:
199 notoken = fenci(notoken)
200 else:
201 notoken = notoken.split()
202
203 idsdata = [vocabulary.get( w, UNK_ID) for w in notoken]
204
205 return idsdata
206
207 #将文件中的内容转成ids,不是Windows下的文件要使用utf8编码格式
208 def textfile_to_idsfile(data_file_name, target_file_name, vocab,
209 normalize_digits=True,Isch=True):
210
211 if not gfile.Exists(target_file_name):
212 print("Tokenizing data in %s" % data_file_name)
213 with gfile.GFile(data_file_name, mode="rb") as data_file:
214 with gfile.GFile(target_file_name, mode="w") as ids_file:
215 counter = 0
216 for line in data_file:
217 counter += 1
218 if counter % 100000 == 0:
219 print(" tokenizing line %d" % counter)
220 token_ids = sentence_to_ids(line.decode('utf8'), vocab,
normalize_digits,Isch)
221 ids_file.write(" ".join([str(tok) for tok in token_ids]) +"\n")
222 def ids2texts( indices,rev_vocab):
223 texts = []
224 for index in indices:
225
226 texts.append(rev_vocab[index])
227 return texts
运行上述代码后,可以在本地路径fanyichina\fromids、fanyichina\toids文件夹下面找到同名的txt文件,打开后能够看到里面全是索引值。
4.对样本文件进行分析图示
为了使bucket的设置机制较合理,我们把样本的数据用图示方式显示出来,直观地看一下每个样本的各个行长度分布情况,在main函数中接着添加以下代码:
代码9-33 datautil(续)
228 def main():
229 ……
230 #分析样本分布
231 filesfrom,_=getRawFileList(data_dir+"fromids/")
232 filesto,_=getRawFileList(data_dir+"toids/")
233 source_train_file_path = filesfrom[0]
234 target_train_file_path= filesto[0]
235 analysisfile(source_train_file_path,target_train_file_path)
236
237 if __name__=="__main__":
238 main()
最后两行为启动main函数。analysisfile为文件的分析函数,实现如下:
代码9-33 datautil(续)
239 def analysisfile(source_file,target_file):
240 #分析文本
241 source_lengths = []
242 target_lengths = []
243
244 with gfile.GFile(source_file, mode="r") as s_file:
245 with gfile.GFile(target_file, mode="r") as t_file:
246 source= s_file.readline()
247 target = t_file.readline()
248 counter = 0
249
250 while source and target:
251 counter += 1
252 if counter % 100000 == 0:
253 print(" reading data line %d" % counter)
254 sys.stdout.flush()
255 num_source_ids = len(source.split())
256 source_lengths.append(num_source_ids)
257 num_target_ids = len(target.split()) + 1#plus 1 for EOStoken
258 target_lengths.append(num_target_ids)
259 source, target = s_file.readline(), t_file.readline()
260 print(target_lengths,source_lengths)
261 if plot_histograms:
262 plot_histo_lengths("target lengths", target_lengths)
263 plot_histo_lengths("source_lengths", source_lengths)
264 if plot_scatter:
265 plot_scatter_lengths("target vs source length", "source
length","target length", source_lengths, target_lengths)
266 def plot_scatter_lengths(title, x_title, y_title, x_lengths, y_lengths):
267 plt.scatter(x_lengths, y_lengths)
268 plt.title(title)
269 plt.xlabel(x_title)
270 plt.ylabel(y_title)
271 plt.ylim(0, max(y_lengths))
272 plt.xlim(0,max(x_lengths))
273 plt.show()
274
275 def plot_histo_lengths(title, lengths):
276 mu = np.std(lengths)
277 sigma = np.mean(lengths)
278 x = np.array(lengths)
279 n, bins, patches = plt.hist(x, 50, facecolor='green', alpha=0.5)
280 y = mlab.normpdf(bins, mu, sigma)
281 plt.plot(bins, y, 'r--')
282 plt.title(title)
283 plt.xlabel("Length")
284 plt.ylabel("Number of Sequences")
285 plt.xlim(0,max(lengths))
286 plt.show()
运行代码,得到如图9-33所示结果。
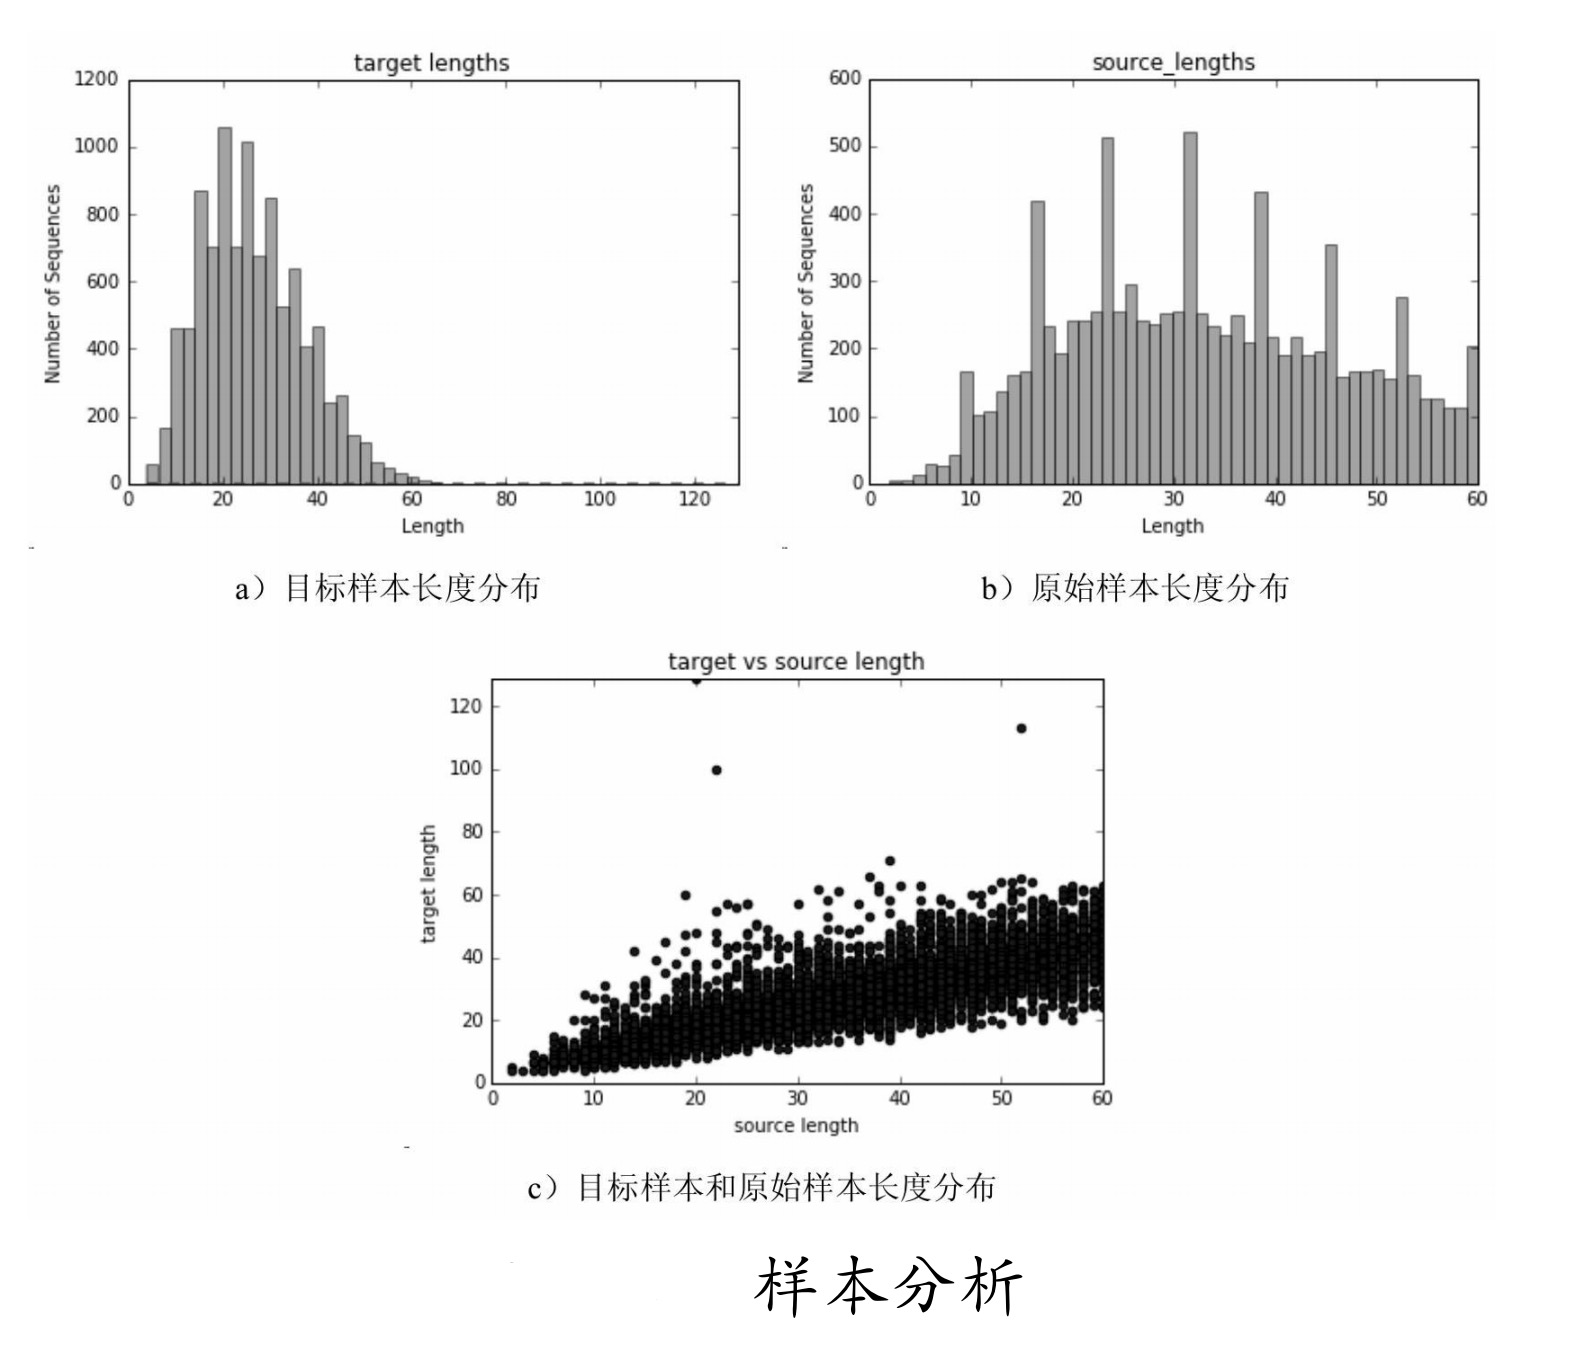
从图中可知,样本的长度都在60之间,可以将bucket分为4个区间,即_buckets =[(20,20),(40,40),(50,50),(60,60)]。
由于输入和输出的长度差别不大,所以令它们的bucket相等。这部分还有更好的方法:可以使用聚类方式处理,然后自动化生成bucket,这样会更加方便,有兴趣的读者可以自己尝试一下。
说明: 网络模型初始化的部分,放到了后面讲解(见代码“9-34 seg2seg_model.py”文件),是想让读者先对整个流程有个大致了解。
5.载入字典准备训练
预处理结束后,就可以开始编写训练代码了,在代码“9-35 train.py”文件里将刚才生成的字典载入,在getfanyiInfo中通过datautil.initialize_vocabulary将字典读入本地。同时引入库,设置初始参数,网络结构为两层,每层100个GRUcell组成的网络,在Seq2Seq模型中解码器与编码器同为相同的这种结构。
代码9-35 train
01 import os
02 import math
03 import sys
04 import time
05 import numpy as np
06 from six.moves import xrange
07 import tensorflow as tf
08 datautil = __import__("9-33 datautil")
09 seq2seq_model = __import__("9-34 seq2seq_model")
10 import datautil
11 import seq2seq_model
12
13 tf.reset_default_graph()
14
15 steps_per_checkpoint=200
16
17 max_train_data_size= 0 #(0代表输入数据的长度没有限制)
18
19 dropout = 0.9
20 grad_clip = 5.0
21 batch_size = 60
22
23 num_layers =2
24 learning_rate =0.5
25 lr_decay_factor =0.99
26
27 #设置翻译模型相关参数
28 hidden_size = 100
29 checkpoint_dir= "fanyichina/checkpoints/"
30 _buckets =[(20, 20), (40, 40), (50, 50), (60, 60)]
31 def getfanyiInfo():
32 vocaben, rev_vocaben=datautil.initialize_vocabulary(os.path.join
(datautil.data_dir, datautil.vocabulary_fileen))
33 vocab_sizeen= len(vocaben)
34 print("vocab_size",vocab_sizeen)
35
36 vocabch, rev_vocabch=datautil.initialize_vocabulary(os.path.join(datautil.data_dir, datautil.vocabulary_filech))
37 vocab_sizech= len(vocabch)
38 print("vocab_sizech",vocab_sizech)
39
40 filesfrom,_=datautil.getRawFileList(datautil.data_dir+"fromids/")
41 filesto,_=datautil.getRawFileList(datautil.data_dir+"toids/")
42 source_train_file_path = filesfrom[0]
43 target_train_file_path= filesto[0]
44 return vocab_sizeen,vocab_sizech,rev_vocaben,rev_vocabch,source_
train_file_path,target_train_file_path
45
46 def main():
47 vocab_sizeen,vocab_sizech,rev_vocaben,rev_vocabch,source_train_
file_path,target_train_file_path = getfanyiInfo()
通过getfanyiInfo函数得到中英词的数量、反向的中英字典、输入样本文件的路径以及目标样本的路径。
6、启动session,创建模型并读取样本数据
代码9-35 train(续)
48 if not os.path.exists(checkpoint_dir):
49 os.mkdir(checkpoint_dir)
50 print ("checkpoint_dir is {0}".format(checkpoint_dir))
51
52 with tf.Session() as sess:
53 model = createModel(sess,False,vocab_sizeen,vocab_sizech)
54 print ("Using bucket sizes:")
55 print (_buckets)
56
57 source_test_file_path = source_train_file_path
58 target_test_file_path = target_train_file_path
59
60 print (source_train_file_path)
61 print (target_train_file_path)
62
63 train_set = readData(source_train_file_path, target_train_file_path,max_train_data_size)
64 test_set = readData(source_test_file_path, target_test_file_path,max_train_data_size)
65
66 train_bucket_sizes = [len(train_set[b]) for b in xrange(len(_buckets))]
67 print( "bucket sizes = {0}".format(train_bucket_sizes))
68 train_total_size = float(sum(train_bucket_sizes))
69
70 train_buckets_scale = [sum(train_bucket_sizes[:i + 1]) / train_total_size for i in xrange(len(train_bucket_sizes))]
71 step_time, loss = 0.0, 0.0
72 current_step = 0
73 previous_losses = []
由于样本不足,这里直接在测试与训练中使用相同的样本,仅仅是为了演示。通过createModel创建模型,并查找检查点文件是否存在,如果存在,则将检测点载入。在createModel中通过调用Seq2SeqModel类生成模型,并指定模型中的具体初始参数。
代码9-35 train(续)
74 def createModel(session, forward_only,from_vocab_size,to_vocab_
size):
75 model = seq2seq_model.Seq2SeqModel(
76 from_vocab_size,#from
77 to_vocab_size,#to
78 _buckets,
79 hidden_size,
80 num_layers,
81 dropout,
82 grad_clip,
83 batch_size,
84 learning_rate,
85 lr_decay_factor,
86 forward_only=forward_only,
87 dtype=tf.float32)
88
89 print("model is ok")
90
91 ckpt = tf.train.latest_checkpoint(checkpoint_dir)
92 if ckpt!=None:
93 model.saver.restore(session, ckpt)
94 print ("Reading model parameters from {0}".format(ckpt))
95 else:
96 print ("Created model with fresh parameters.")
97 session.run(tf.global_variables_initializer())
98
99 return model
通过latest_checkpoint发现检查点文件。如果有检查点文件,就将其恢复到session中。读取文件的函数定义如下:为了适用带有bucket机制的网络模型,按照bucket的大小序列读取数据,先按照bucket的个数定义好数据集data_set,然后在读取每一对输入、输出时,都会比较其适合哪个bucket,并将其放入对应的bucket中,最后返回data_set。
代码9-35 train(续)
100 def readData(source_path, target_path, max_size=None):
101 '''
102 这个方法来自于tensorflow 中的translation 例子
103 '''
104 data_set = [[] for _ in _buckets]
105 with tf.gfile.GFile(source_path, mode="r") as source_file:
106 with tf.gfile.GFile(target_path, mode="r") as target_file:
107 source, target = source_file.readline(), target_file.readline()
108 counter = 0
109 while source and target and (not max_size or counter < max_size):
110 counter += 1
111 if counter % 100000 == 0:
112 print(" reading data line %d" % counter)
113 sys.stdout.flush()
114 source_ids = [int(x) for x in source.split()]
115 target_ids = [int(x) for x in target.split()]
116 target_ids.append(vocab_utils.EOS_ID)
117 for bucket_id, (source_size, target_size) in enumerate(_buckets):
118 if len(source_ids) < source_size and len(target_
ids) < target_size:
119 data_set[bucket_id].append([source_ids,target_ids])
120 break
121 source, target = source_file.readline(), target_file.readline()
122 return data_set
对于输出的每一句话都会加上EOS_ID,这么做的目的是为了让网络学习到结束的标记,可以控制输出的长短。
7.通过循环进行训练
在main函数中接着添加代码:通过循环来调用model.step进行迭代训练,每执行steps_per_checkpoint次,就保存检查点;测试结果,并将结果输出。
代码9-35 train(续)
123 def main():
124 ……
125 while True:
126 # 根据数据样本的分布情况来选择bucket
127
128 random_number_01 = np.random.random_sample()
129 bucket_id = min([i for i in xrange(len(train_buckets_scale)) if train_buckets_scale[i] > random_number_01])
130
131 # 开始训练
132 start_time = time.time()
133 encoder_inputs, decoder_inputs, target_weights = model.get_batch(train_set, bucket_id)
134 _, step_loss, _ = model.step(sess, encoder_inputs, decoder_inputs,target_weights, bucket_id, False)
135 step_time += (time.time() - start_time) / steps_per_checkpoint
136 loss += step_loss / steps_per_checkpoint
137 current_step += 1
138
139 # 保存检查点,测试数据
140 if current_step % steps_per_checkpoint == 0:
141 # Print statistics for the previous epoch.
142 perplexity = math.exp(loss) if loss < 300 else float('inf')
143 print ("global step %d learning rate %.4f step-time %.2f perplexity "
144 "%.2f" % (model.global_step.eval(), model.learning_rate.eval(),step_time, perplexity))
145 # 退化学习率
146 if len(previous_losses) > 2 and loss > max(previous_
losses[-3:]):
147 sess.run(model.learning_rate_decay_op)
148 previous_losses.append(loss)
149 # 保存checkpoint
150 checkpoint_path = os.path.join(checkpoint_dir,
"seq2seqtest.ckpt")
151 print(checkpoint_path)
152 model.saver.save(sess, checkpoint_path, global_step=
model.global_step)
153 step_time, loss = 0.0, 0.0 # 初始化为0
154 # 输出test_set中 empty bucket的bucket_id
155 if len(test_set[bucket_id]) == 0:
156 print(" eval: empty bucket %d" % (bucket_id))
157 continue
158 encoder_inputs, decoder_inputs, target_weights =
model.get_batch(test_set, bucket_id)
159
160 _, eval_loss,output_logits = model.step(sess,
encoder_inputs, decoder_inputs,target_weights, bucket_id, True)
161 eval_ppx = math.exp(eval_loss) if eval_loss < 300 else
float('inf')
162 print(" eval: bucket %d perplexity %.2f" % (bucket_
id, eval_ppx))
163
164
165 inputstr = datautil.ids2texts(reversed([en[0] for en
in encoder_inputs]) ,rev_vocaben)
166 print("输入",inputstr)
167 print("输出",datautil.ids2texts([en[0] for en in
decoder_inputs] ,rev_vocabch))
168
169 outputs = [np.argmax(logit, axis=1)[0] for logit in
output_logits]
170
171 if datautil.EOS_ID in outputs:
172 outputs = outputs[:outputs.index(datautil.
EOS_ID)]
173 print("结果",datautil.ids2texts(outputs,rev_
vocabch))
174
175 sys.stdout.flush()
176
177 if __name__ == '__main__':
178 main()
这里使用的是一个死循环,默认会一直训练下去。因为有检查点文件,所以可以不用关注迭代次数,通过输出测试的打印结果与loss值,可以看出模型的好坏。训练到一定程度后直接退出即可。
8.网络模型Seq2SeqModel的初始化
这里为了先让读者对整体流程有个了解,所以将网络模型放在了最后单独介绍。这部分的代码在“9-34 seq2seq_model.py”文件中,该代码为GitHub中的一个例子代码,我们在其上面做了修改,增加了dropout功能,在初始化函数中增加了dropout_keep_prob参数。
在原有代码中,由于指定了输出的target_vocab_size,表明要求在模型结束后输出的应该是target_vocab_size其中的一类(one_hot),所以先定义了output_projection参数,里面由w和b构成,作为最后输出的权重。
代码9-34 seq2seq_model
01 """带有注意力机制的Sequence-to-sequence 模型."""
02
03 from __future__ import absolute_import
04 from __future__ import division
05 from __future__ import print_function
06
07 import random
08
09 import numpy as np
10 from six.moves import xrange # pylint: disable=redefined-builtin
11 import tensorflow as tf
12 datautil = __import__("9-33 datautil")
13 import datautil as data_utils
14
15 class Seq2SeqModel(object):
16 """带有注意力机制并且具有multiple buckets的Sequence-to-sequence 模型.
17 这个类实现了一个多层循环网络组成的编码器和一个具有注意力机制的解码器.完全是按照论文:
18 https://arxiv.org/abs/1412.7449 - 中所描述的机制实现。更多细节信息可以参看论文内容
19 这个class 除了使用LSTM cells还可以使用GRU cells, 还使用了sampled
softmax 来
20 处理大词汇量的输出. 在论文https://arxiv.org/abs/1412.2007中的第三节描述了
21 sampled softmax。在论文https://arxiv.org/abs/1409.0473里面还有一个关于
这个模型的一个单层的使用双向RNN编码器的版本
22
23 """
24
25 def __init__(self,
26 source_vocab_size,
27 target_vocab_size,
28 buckets,
29 size,
30 num_layers,
31 dropout_keep_prob,
32 max_gradient_norm,
33 batch_size,
34 learning_rate,
35 learning_rate_decay_factor,
36 use_lstm=False,
37 num_samples=512,
38 forward_only=False,
39 dtype=tf.float32):
40 """创建模型
41
42 Args:
43 source_vocab_size:原词汇的大小.
44 target_vocab_size:目标词汇的大小.
45 buckets: 一个 (I, O)的list, I 代表输入的最大长度,O代表输出的最大长度,例如
46 [(2, 4), (8, 16)].
47 size: 模型中每层的units个数.
48 num_layers: 模型的层数.
49 max_gradient_norm: 截断梯度的阀值.
50 batch_size: 训练中的批次数据大小;
51 learning_rate: 开始学习率.
52 learning_rate_decay_factor: 退化学习率的衰减参数.
53 use_lstm: 如果true, 使用 LSTM cells 替代GRU cells.
54 num_samples: sampled softmax的样本个数.
55 forward_only: 如果设置了, 模型只有正向传播.
56 dtype: internal variables的类型.
57 """
58 self.source_vocab_size = source_vocab_size
59 self.target_vocab_size = target_vocab_size
60 self.buckets = buckets
61 self.batch_size = batch_size
62 self.dropout_keep_prob_output = dropout_keep_prob
63 self.dropout_keep_prob_input = dropout_keep_prob
64 self.learning_rate = tf.Variable(
65 float(learning_rate), trainable=False, dtype=dtype)
66 self.learning_rate_decay_op = self.learning_rate.assign(
67 self.learning_rate * learning_rate_decay_factor)
68 self.global_step = tf.Variable(0, trainable=False)
69
70 # 如果使用 sampled softmax, 需要一个输出的映射.
71 output_projection = None
72 softmax_loss_function = None
73 # 当采样数小于vocabulary size 时Sampled softmax 才有意义
74 if num_samples > 0 and num_samples < self.target_vocab_size:
75 w_t = tf.get_variable("proj_w", [self.target_vocab_size, size],
dtype=dtype)
76 w = tf.transpose(w_t)
77 b = tf.get_variable("proj_b", [self.target_vocab_size], dtype=
dtype)
78 output_projection = (w, b)
lobal_step变量的作用是同步检查点文件对应的迭代步数。
9.自定义损失函数
sampled_loss为自定义损失函数,计算在分类target_vocab_size里模型输出的logits与标签labels(seq2seq框架中的输出)之间的交叉熵,并将该函数指针赋值给softmax_loss_function。softmax_loss_function会在后面使用model_with_buckets时,作为参数传入。
代码9-34 seq2seq_model(续)
79 def sampled_loss(labels, logits):
80 labels = tf.reshape(labels, [-1, 1])
81 #需要使用 32bit的浮点数类型来计算sampled_softmax_loss,才能避免数值的不稳定性
82 local_w_t = tf.cast(w_t, tf.float32)
83 local_b = tf.cast(b, tf.float32)
84 local_inputs = tf.cast(logits, tf.float32)
85 return tf.cast(
86 tf.nn.sampled_softmax_loss(
87 weights=local_w_t,
88 biases=local_b,
89 labels=labels,
90 inputs=local_inputs,
91 num_sampled=num_samples,
92 num_classes=self.target_vocab_size),
93 dtype)
94 softmax_loss_function = sampled_loss
10. 定义Seq2Seq框架结构
seq2seq_f函数的作用是定义Seq2Seq框架结构,该函数也是为了使用model_with_buckets时,作为参数传入。前面介绍model_with_buckets函数时说该函数更像一个封装好的框架,原因就在于此。
读者也要适应这种方式:将损失函数、网络结构、buckets统统定义完,然后将它们作为参数放入model_with_buckets函数中,之后一切交给TensorFlow来实现即可。
代码9-34 seq2seq_model(续)
95 # 使用词嵌入量(embedding)作为输入
96 def seq2seq_f(encoder_inputs, decoder_inputs, do_decode):
97
98 with tf.variable_scope("GRU") as scope:
99 cell = tf.contrib.rnn.DropoutWrapper(
100 tf.contrib.rnn.GRUCell(size),
101 input_keep_prob=self.dropout_keep_prob_input,
102 output_keep_prob=self.dropout_keep_prob_output)
103 if num_layers > 1:
104 cell = tf.contrib.rnn.MultiRNNCell([cell] * num_layers)
105
106 print("new a cell")
107 return tf.contrib.legacy_seq2seq.embedding_attention_seq2seq(
108 encoder_inputs,
109 decoder_inputs,
110 cell,
111 num_encoder_symbols=source_vocab_size,
112 num_decoder_symbols=target_vocab_size,
113 embedding_size=size,
114 output_projection=output_projection,
115 feed_previous=do_decode,
116 dtype=dtype)
上面代码中,额外加了一个打印信息print("new a cell"),是为了测试seq2seq_model函数是什么时被调用的,在实验中可以得出结论。在构建网络模型时,会由model_with_buckets函数来调用,而model_with_buckets函数调用的次数取决于bucket的个数,即在model_with_buckets函数中,会为每个bucket使用seq2seq_f函数构建出一套网络Seq2Seq的网络模型,但是不用担心,它们的权重是共享的。具体可以参见model_with_buckets函数的实现,就是使用了共享变量的机制。
11.定义Seq2seq模型的输入占位符
下面定义Seq2Seq模型的输入占位符,这些占位符都是为了传入model_with_buckets函数中做准备的。
首先是Seq2Seq模型自己的两个list占位符:一个是输入encoder_inputs,一个是输出decoder_inputs。另外,model_with_buckets还需要一个额外的输入,在前面已经提过,因为其在做loss时使用的是带权重的交叉熵,所以还要输入大小等同于decoder_inputs的权重target_weights。
另外还有一个输入就是做交叉熵时的标签targets,因为它与decoder_inputs一样,所以可以直接由decoder_inputs变换而来,把decoder_inputs的第一个“_GO”去掉,在放到targets中。
代码9-34 seq2seq_model(续)
117 # 注入数据
118 self.encoder_inputs = []
119 self.decoder_inputs = []
120 self.target_weights = []
121 for i in xrange(buckets[-1][0]): # 最后的bucket 是最大的
122 self.encoder_inputs.append(tf.placeholder(tf.int32,
shape=[None],
123 name="encoder{0}".format(i)))
124 for i in xrange(buckets[-1][1] + 1):
125 self.decoder_inputs.append(tf.placeholder(tf.int32, shape=
[None],
126 name="decoder{0}".format(i)))
127 self.target_weights.append(tf.placeholder(dtype, shape=[None],
128 name="weight{0}".format(i)))
129
130 #将解码器移动一位得到targets
131 targets = [self.decoder_inputs[i + 1]
132 for i in xrange(len(self.decoder_inputs) - 1)]
占位符的list大小是取buckets中的最大数。targets的长度与buckets 的长度一致,decoder_inputs与target_weights的长度会比buckets的长度大1,因为前面有“_GO”占位。
12.定义正向的输出与loss
当一切参数准备好后,就可以使用model_with_buckets将整个网络贯穿起来了。在测试时会只进行正向传播,这时seq2seq_f里面的最后一个参数为True,该参数最终会在seq2seq_f里的embedding_attention_seq2seq中的feed_previous中生效。前面介绍过,如果为True时,表明只有第一个decoder输入是“_GO”开头,这样可以保证测试时,模型可以一直记着前面的cell状态。
代码9-34 seq2seq_model(续)
133 # 训练的输出和loss定义
134 if forward_only:
135 self.outputs, self.losses = tf.contrib.legacy_seq2seq.model_
with_buckets(
136 self.encoder_inputs, self.decoder_inputs, targets,
137 self.target_weights, buckets, lambda x, y: seq2seq_f(x, y,
True),
138 softmax_loss_function=softmax_loss_function)
139 # 如果使用了输出映射,需要为解码器映射输出处理
140 if output_projection is not None:
141 for b in xrange(len(buckets)):
142 self.outputs[b] = [
143 tf.matmul(output, output_projection[0]) + output_
projection[1]
144 for output in self.outputs[b]
145 ]
146 else:
147 self.outputs, self.losses = tf.contrib.legacy_seq2seq.model_
with_buckets(
148 self.encoder_inputs, self.decoder_inputs, targets,
149 self.target_weights, buckets,
150 lambda x, y: seq2seq_f(x, y, False),
151 softmax_loss_function=softmax_loss_function)
在测试过程中,还需要将model_with_buckets的输出结果转化成outputs维度的one_hot。因为model_with_buckets是多个桶的输出,所以需要对每个桶都进行转换。
13.反向传播计算梯度并通过优化器更新
在前面已经通过model_with_buckets得到了loss。
下面的代码先通过tf.trainable_variables函数获得可训练的参数params,然后用tf.gradients计算loss对应参数params的梯度,并通过tf.clip_by_global_norm将过大的梯度按照max_gradient_norm来截断,将截断后的梯度通过优化器opt来迭代更新。同样,还要针对每个桶(bucket)进行这样的操作。
代码9-34 seq2seq_model(续)
152 # 梯度下降更新操作
153 params = tf.trainable_variables()
154 if not forward_only:
155 self.gradient_norms = []
156 self.updates = []
157 opt = tf.train.GradientDescentOptimizer(self.learning_rate)
158 for b in xrange(len(buckets)):
159 gradients = tf.gradients(self.losses[b], params)
160 clipped_gradients, norm = tf.clip_by_global_norm(gradients,
161 max_gradient_norm)
162 self.gradient_norms.append(norm)
163 self.updates.append(opt.apply_gradients(
164 zip(clipped_gradients, params), global_step=self.global_step))
165
166 self.saver = tf.train.Saver(tf.global_variables())
最后更新saver,在代码“9-35 train.py”中会调用这部分代码来保存训练中的学习参数及相关变量。
14.按批次获取样本数据
在模型中,按批次获取的样本数据并不能直接使用,还需要在get_batch函数中进行相应转化,首先根据指定bucket_id所对应的大小确定输入和输出的size,根据size进行pad的填充,并且针对输出数据进行第一位为“_Go”的重整作为解码的input。这里用了个小技巧将输入的数据进行了倒序排列。而对于输入weight则将其全部初始化为0,对应的size为每一批次中decoder每个序列一个权重weight,即与decoder相等。
代码9-34 seq2seq_model(续)
167 def get_batch(self, data, bucket_id):
168 """在迭代训练过程中,从指定 bucket中获得一个随机批次数据
169
170 Args:
171 data: 一个大小为len(self.buckets)的tuple,包含了创建一个batch中的输入输出的
172 lists.
173 bucket_id: 整型, 指定从哪个bucket中取数据.
174
175 Returns:
176 方便以后调用的 triple (encoder_inputs, decoder_inputs, target_weights)
177 .
178 """
179 encoder_size, decoder_size = self.buckets[bucket_id]
180 encoder_inputs, decoder_inputs = [], []
181
182 # 获得一个随机批次的数据作为编码器与解码器的输入
183 # 如果需要时会有pad操作, 同时反转encoder的输入顺序,并且为decoder添加GO
184 for _ in xrange(self.batch_size):
185 encoder_input, decoder_input = random.choice(data[bucket_id])
186
187 # pad和反转Encoder 的输入数据
188 encoder_pad = [data_utils.PAD_ID] * (encoder_size - len(encoder_
input))
189 encoder_inputs.append(list(reversed(encoder_input + encoder_
pad)))
190
191 # 为Decoder输入数据添加一个额外的“GO”,
并且进行pad
192 decoder_pad_size = decoder_size - len(decoder_input) - 1
193 decoder_inputs.append([data_utils.GO_ID] + decoder_input +
194 [data_utils.PAD_ID] * decoder_pad_size)
195
196 # 从上面选择好的数据中创建 batch-major vectors
197 batch_encoder_inputs, batch_decoder_inputs, batch_weights = [], [], []
198
199 for length_idx in xrange(encoder_size):
200 batch_encoder_inputs.append(
201 np.array([encoder_inputs[batch_idx][length_idx]
202 for batch_idx in xrange(self.batch_size)], dtype=
np.int32))
203
204 for length_idx in xrange(decoder_size):
205 batch_decoder_inputs.append(
206 np.array([decoder_inputs[batch_idx][length_idx]
207 for batch_idx in xrange(self.batch_size)], dtype=
np.int32))
208
209 # 定义target_weights 变量,默认是1,如果对应的targets是padding,
则target_weigts就为0
210 batch_weight = np.ones(self.batch_size, dtype=np.float32)
211 for batch_idx in xrange(self.batch_size):
212 # 如果对应的输出target 是一个 PAD符号,就将weight设为0
213 # 将decoder_input向前移动1位得到对应的target
214 if length_idx < decoder_size - 1:
215 target = decoder_inputs[batch_idx][length_idx + 1]
216 if length_idx == decoder_size - 1 or target == data_utils.PAD_ID:
217 batch_weight[batch_idx] = 0.0
218 batch_weights.append(batch_weight)
219 return batch_encoder_inputs, batch_decoder_inputs, batch_weights
15.Seq2Seq框架的迭代更新处理
这部分代码主要是构建输入feed数据,即输出的OP。在输入时,根据传入的bucket_id构建相应大小的输入输出list,通过循环传入list中对应的操作符里。由于decoder_inputs的长度比bucket中的长度大1,所以需要再多放一位到decoder_inputs的list中,在前面构建targets时,需要将所有的decoder_inputs向后移一位,targets作为标签要与bucket中的长度相等。确切地说target_weights是与targets相等的,所以不需要再输入值。
代码9-34 seq2seq_model(续)
220 def step(self, session, encoder_inputs, decoder_inputs, target_weights,
221 bucket_id, forward_only):
222 """注入给定输入数据步骤
223
224 Args:
225 session: tensorflow 所使用的session
226 encoder_inputs:用来注入encoder输入数据的numpy int vectors类型的list
227 decoder_inputs:用来注入decoder输入数据的numpy int vectors类型的list
228 target_weights:用来注入target weights的numpy float vectors类型的list
229 bucket_id: which bucket of the model to use
230 forward_only: 只进行正向传播
231
232 Returns:
233 一个由gradient norm (不做反向时为none),average perplexity, and the outputs组成的triple
234
235 Raises:
236 ValueError:如果 encoder_inputs, decoder_inputs, 或者是target_weights 的长度与指定bucket_id 的bucket size不符合
237 """
238 # 检查长度
239 encoder_size, decoder_size = self.buckets[bucket_id]
240 if len(encoder_inputs) != encoder_size:
241 raise ValueError("Encoder length must be equal to the one in bucket,"
242 " %d != %d." % (len(encoder_inputs), encoder_size))
243 if len(decoder_inputs) != decoder_size:
244 raise ValueError("Decoder length must be equal to the one in
bucket,"
245 " %d != %d." % (len(decoder_inputs), decoder_size))
246 if len(target_weights) != decoder_size:
247 raise ValueError("Weights length must be equal to the one inbucket,"
248 " %d != %d." % (len(target_weights), decoder_size))
249
250 # 定义Input feed
251 input_feed = {}
252 for l in xrange(encoder_size):
253 input_feed[self.encoder_inputs[l].name] = encoder_inputs[l]
254 for l in xrange(decoder_size):
255 input_feed[self.decoder_inputs[l].name] = decoder_inputs[l]
256 input_feed[self.target_weights[l].name] = target_weights[l]
257
258 last_target = self.decoder_inputs[decoder_size].name
259 input_feed[last_target] = np.zeros([self.batch_size], dtype=np.int32)
260
261 # 定义Output feed
262 if not forward_only:
263 output_feed = [self.updates[bucket_id],
264 self.gradient_norms[bucket_id],
265 self.losses[bucket_id]]
266 else:
267 output_feed = [self.losses[bucket_id]]
268 for l in xrange(decoder_size):
269 output_feed.append(self.outputs[bucket_id][l])
270
271 outputs = session.run(output_feed, input_feed)
272 if not forward_only:
273 return outputs[1], outputs[2], None
274 else:
275 return None, outputs[0], outputs[1:]
对于输出,也要区分是测试还是训练。如果是测试,需要将loss与logit输出,结果在outputs中,outputs[0]为loss,outputs[1:]为输出的decoder_size大小序列。如果是训练,输出需要更新的梯度与loss。这里多输出一个None是为了统一输出,保证第二位输出的都是loss。整个代码进展到这里就可以进行训练操作了,运行train.py文件,将模型运行起来进行迭代训练。输出结果如下:
Building prefix dict from the default dictionary ...
Loading model from cache C:\Users\LIJINH~1\AppData\Local\Temp\jieba.cache
Loading model cost 0.672 seconds.
Prefix dict has been built succesfully.
vocab_size 11963
vocab_sizech 15165
checkpoint_dir is fanyichina/checkpoints/
new a cell
new a cell
new a cell
new a cell
model is ok
Using bucket sizes:
[(20, 20), (40, 40), (50, 50), (60, 60)]
fanyichina/fromids/english1w.txt
fanyichina/toids/chinese1w.txt
bucket sizes = [1649, 4933, 1904, 1383]
fanyichina/checkpoints/seq2seqtest.ckpt
WARNING:tensorflow:Error encountered when serializing LAYER_NAME_UIDS.
Type is unsupported, or the types of the items don't match field type in
CollectionDef.
'dict' object has no attribute 'name'
eval: bucket 0 perplexity 1.71
可以看到输出了词典的大小vocab_size11963、vocab_sizech 15165,与定义的buckets,4个bucket分别需要调用4次seq2seq_f,于是打印了4次new a cell。接着会显示每一批次中每个bucket的输入(因为是反转的,这里已经给反过来了),并且能够看到对输入的pad进行了填充。对于每个输出由'_GO'字符开始,结束时都会有'_EOS'字符。对于模型预测的输出结果,也是将'_EOS'字符前面的内容打印出来,没有'_EOS'字符的预测结果将视为没有翻译成功,因此没有打印出来。
16.测试模型
测试模型代码在代码“9-36 test.py”文件中,与前面实例中的代码基本相似,需要考虑的是,在创建模型时要使用测试模式(最后一个参数为True),并且dropout设为1.0。在main函数里,先等待用户输入,然后对用户输入的字符进行处理并传入模型,最终输出结果并显示出来。完整代码如下。
代码9-36 test
01 import tensorflow as tf
02 import numpy as np
03 import os
04 from six.moves import xrange
05
06 _buckets = []
07 convo_hist_limit = 1
08 max_source_length = 0
09 max_target_length = 0
10
11 flags = tf.app.flags
12 FLAGS = flags.FLAGS
13 datautil = __import__("9-33 datautil")
14 seq2seq_model = __import__("9-34 seq2seq_model")
15 import datautil
16 import seq2seq_model
17
18 tf.reset_default_graph()
19
20 max_train_data_size= 0 #0表示训练数据的输入长度没有限制
21
22 data_dir = "datacn/"
23
24 dropout = 1.0
25 grad_clip = 5.0
26 batch_size = 60
27 hidden_size = 14
28 num_layers =2
29 learning_rate =0.5
30 lr_decay_factor =0.99
31
32 checkpoint_dir= "data/checkpoints/"
33
34 ###############翻译
35 hidden_size = 100
36 checkpoint_dir= "fanyichina/checkpoints/"
37 data_dir = "fanyichina/"
38 _buckets =[(20, 20), (40, 40), (50, 50), (60, 60)]
39
40 def getfanyiInfo():
41 vocaben, rev_vocaben=datautil.initialize_vocabulary(os.path.join
(datautil.data_dir, datautil.vocabulary_fileen))
42 vocab_sizeen= len(vocaben)
43 print("vocab_size",vocab_sizeen)
44
45 vocabch, rev_vocabch=datautil.initialize_vocabulary(os.path.join
(datautil.data_dir, datautil.vocabulary_filech))
46 vocab_sizech= len(vocabch)
47 print("vocab_sizech",vocab_sizech)
48
49 return vocab_sizeen,vocab_sizech,vocaben,rev_vocabch
50
51 def main():
52
53 vocab_sizeen,vocab_sizech,vocaben,rev_vocabch= getfanyiInfo()
54
55 if not os.path.exists(checkpoint_dir):
56 os.mkdir(checkpoint_dir)
57 print ("checkpoint_dir is {0}".format(checkpoint_dir))
58
59 with tf.Session() as sess:
******ebook converter DEMO Watermarks*******
60 model = createModel(sess,True,vocab_sizeen,vocab_sizech)
61
62 print (_buckets)
63 model.batch_size = 1
64
65 conversation_history =[]
66 while True:
67 prompt = "请输入: "
68 sentence = input(prompt)
69 conversation_history.append(sentence.strip())
70 conversation_history = conversation_history[-convo_hist_
limit:]
71
72 token_ids = list(reversed( datautil.sentence_to_ids(" ".
join(conversation_history) ,vocaben,normalize_digits=True,
Isch=False) ) )
73 print(token_ids)
74 bucket_id = min([b for b in xrange(len(_buckets))if _buckets
[b][0] > len(token_ids)])
75
76 encoder_inputs, decoder_inputs, target_weights = model.
get_batch({bucket_id: [(token_ids, [])]}, bucket_id)
77
78 _, _, output_logits = model.step(sess, encoder_inputs,
decoder_inputs,target_weights, bucket_id, True)
79
80 #使用 beam search策略
81 outputs = [int(np.argmax(logit, axis=1)) for logit in
output_logits]
82 print("outputs",outputs,datautil.EOS_ID)
83 if datautil.EOS_ID in outputs:
84 outputs = outputs[:outputs.index(datautil.EOS_ID)]
85
86 convo_output = " ".join(datautil.ids2texts(outputs,
rev_vocabch))
87 conversation_history.append(convo_output)
88 print (convo_output)
89 else:
90 print("can not translation!")
91
92 def createModel(session, forward_only,from_vocab_size,to_vocab_size):
93 """Create translation model and initialize or load parameters in
session."""
94 model = seq2seq_model.Seq2SeqModel(
95 from_vocab_size,#from
96 to_vocab_size,#to
97 _buckets,
98 hidden_size,
99 num_layers,
100 dropout,
101 grad_clip,
102 batch_size,
103 learning_rate,
104 lr_decay_factor,
105 forward_only=forward_only,
106 dtype=tf.float32)
107
108 print("model is ok")
109
110 ckpt = tf.train.latest_checkpoint(checkpoint_dir)
111 if ckpt!=None:
112 model.saver.restore(session, ckpt)
113 print ("Reading model parameters from {0}".format(ckpt))
114 else:
115 print ("Created model with fresh parameters.")
116 session.run(tf.global_variables_initializer())
117
118 return model
119
120 if __name__=="__main__":
121 main()
运行代码,结果如下:
Building prefix dict from the default dictionary ...
Loading model from cache C:\Users\LIJINH~1\AppData\Local\Temp\jieba.cache
Loading model cost 0.719 seconds.
Prefix dict has been built succesfully.
vocab_size 11963
vocab_sizech 15165
checkpoint_dir is fanyichina/checkpoints/
new a cell
new a cell
new a cell
new a cell
model is ok
INFO:tensorflow:Restoring parameters from fanyichina/checkpoints/
seq2seqtest.ckpt-99600
Reading model parameters from fanyichina/checkpoints/seq2seqtest.
ckpt-99600
[(20, 20), (40, 40), (50, 50), (60, 60)]
请输入: will reap good results and the large
[149, 4, 6, 341, 169, 4980, 22]
not use
outputs[838,838,26,105,643,8,1595,1089,5,968,8,968,6,2,5,1365,6,2,6,2]2
最终 最终 也 会 对此 和 坚强 有力 的 指导 和 指导 .
当前的例子是“跑了”约半天时间的模型效果,通过载入检查点打印信息可以看到当前迭代了99 600次,从原有的样本中简单复制几句话输入系统中,则系统可以大致翻译出一些汉语。可以看到它并没有按照词顺序逐个翻译,而是用学到原有样本的意思来表达,尽管语句还不通畅。这里只是做个演示,如果需要训练更好的模型,可以增加样本数量,并增加训练时间。


文件“9-33 datautil.py”:样本预处理文件。
文件“9-34 seq2seq_model.py”:模型文件,该文件是在GitHub上TensorFlow的例子基础上修改而来。
文件“9-35 train.py”:模型的训练文件。
文件“9-36 test.py”:模型的测试使用文件。
有这几个的源代码么